It is the last day of March and, after a fairly mild month, light snow flurries are hinting of a bigger storm passing through the Sierras. We need the snow, desperately. This region is in a severe drought and therefore residents don’t mind if winter chooses to come a bit late. Bring on those April showers.
Even with the mild weather, it has still been challenging to keep those extra winter pounds off. Seems I always pack on about five to seven of them. I’m not always disciplined with my diet and I am partial to a local coffee shop’s vanilla chai lattes. Probably not the leanest things to drink but they sure hit the spot! So now, when my pants feel a bit snug around the waist, I have to think about eating better and getting to the gym (and limiting my chai addiction). Lately, I have been incorporating leaner meats in my dishes, like ground turkey instead of ground beef. Here is a nice rustic skillet dish that is fairly light, but hearty enough to keep you warm on a chilly winterish spring evening. I used pasta that I had in the pantry, but wheat or a gluten-free variety would make an excellent substitute.
 Ingredients
12 oz. Ground Turkey
1 tsp oil (olive, Canola)
2 medium Carrots, chopped
1 stalk Celery, chopped
4 oz. Cremini Mushrooms, chopped
1/2 Onion, chopped
1-2 Garlic Cloves, chopped
28-oz can 2 14-oz cans) Diced Tomatoes, undrained
1/2 cup Dry Red Wine
1 – 2 tsps. fennel seeds, crushed
12 oz. Pasta
2 Tbsp Fresh Parsley, chopped, or 1 Tbsp. dried Parsley
Grated Parmesan Cheese

Heat the oil and cook ground turkey…

…until no longer pink. Remove to a plate.

Cook the carrots, celery and onion over medium heat.

Cook for about five minutes until they begin to soften.

Add the mushrooms and garlic and cook through, about three to five minutes.

All the veggies cooked through.

Add the diced tomatoes and mash with a potato masher or meat pounder.

Incorporate with the veggies for the beginning of a nice ragu.

Add the wine…

…fennel seeds…

…and cooked turkey.

Stir together and bring to a simmer.

Reduce to low heat; cover and cook, stirring occasionally, until the sauce is slightly thickened and the flavors have developed, about 30 minutes. While your ragu is getting its groove on, cook your pasta as directed on the package.

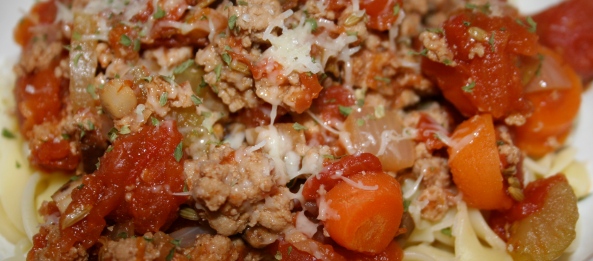
Serve the ragu over the cooked pasta. Sprinkle with parsley and parmesan. Enjoy!